Showing posts with label Diy. Show all posts

Thursday, January 8, 2015

DIY Bee and Puppycat- Bee's sweater!


So I'm sorry I didn't take progress photo's but I will use the pictures I took after the fact to do this tutorial!

I took this! 


And made it into this!


You need!

- One white Hanes comfort blend long sleeved sweater(I got mine at walmart) Its also says Soft Sweats with Ecosmart yarn. It cost less then $10
- The dye I bought was a small packet of Tulpic Fabric dye, but what ever you want to dye it with is A-Ok!
- You need three squares of felt, Black, White, And Yellow
- Yarn/needle for hand sewing, or machine, whatever works!
- Hot Glue or fabric Glue if you don't want to sew
Directions!

Step one!

Dye that sweater! Just follow the directions and soak less time then recommended. I removed it sooner than later so that the final color would not be a very dark or strong yellow.

Step two Add the Bee

Once the sweater is all dry its time to add the bee and the collar. 


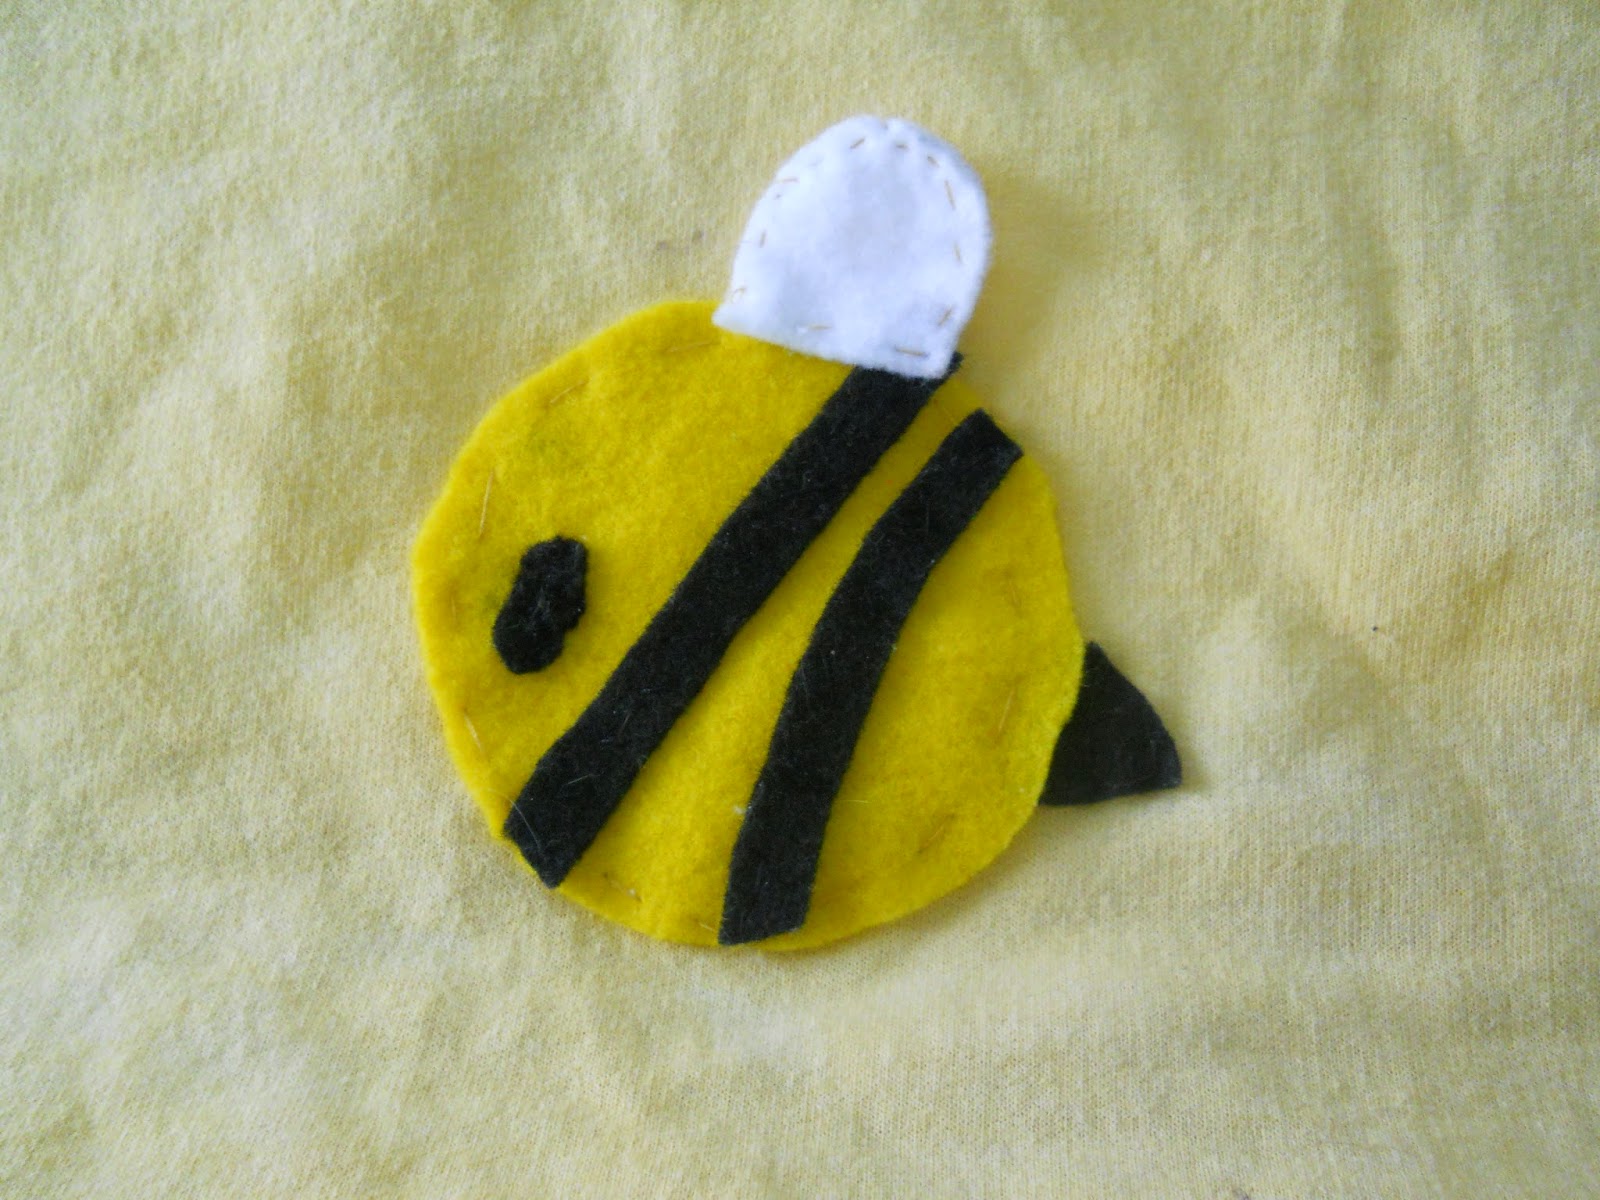
Lets do the Bee first!


  • Out of the Yellow felt you only need a smallish circle(depending on how big you want it to be). I left a bit of an angle at one end to give the impression of a nose. 
  • From the Black Felt you need 2 or 3 strips as long as your circle and depending on how much space you have on your circle for the strips. You also need a small triangle and a small oval. You could add a mouth if you want. 
  • Also you need one small wing from the White felt!
  • I used yellow and black thread for this. 


1) Sew/handsew/glue the yellow circle leaving a generous circle of space between the stitch and the edge. 
2) Situate the white wing slightly on top of the yellow circleand sew/glue into place
3) Situate the black triangle at the yellow circle's rear end and underneath the space between the edge and the stitch. Sew/glue into place. 
4) Sew/Glue the small black oval into place.
5) Arrange and Sew/Glue the black Strips into place. 

Step 3 Add the Collar


-For this collar you will only need 4 total pieces of the same shape. This is a peter pan collar and you can look up different references for it. I suggest making the pattern on a piece of paper to figure out how big you want it to be. 
        *I actually folded a piece of white felt(Hot Dog Style) and cut the peter pan collar in a way that the straight top part is on top. The bottom part that has curved edges is on the bottom and the 2 pieces are slightly connected due to the hot dog style fold. 

1) Make your peter pan collar pattern. Decide how big it should be.
2) Cut out 4 pieces(* see that paragraph to make this easier) 
3) Fold the top of the collar over the collar of the yellow sweater and sew/glue into place. Repeat for the other collar. 

And there you have it. One Bee sweater!


See it on me in my awesome Bee Makeup tutorial!

Follow me on Facebook! Follow us on Pinterest! and Subscribe to me on Youtube!


Wednesday, July 30, 2014

RB's motivation: Vanellope tights, 3rd times the charm?

I am currently awaiting to take off the finished tights and scrub paint off myself. But while I wait, let me write up my experience. Surprised it took me this long to realize, Oh I can paint things,........art school will be terrible or great for my common sense

So here is the start off. I taped up my legs to get clean edges and an idea of the size for each stripe, really I should know by now. But beware I taped my thigh and upper calf too tight and it really affected the painting process. Because I was worried about cutting off circulation (hypochondriac senses at too early) I did not wait long enough for things to dry and you will see.
 Started the first stripe. I had to use acrylic paint b/c I forgot to buy white fabric paint at the store, didn't think I could vani done on a insomnia night int he week so only got black, purple and red. PURPLE OVER WHITE? What sickness do I have now? SO that affected things. Because acrylic is plastic and dries easilly it's really thick and does not cling to fabric too well.
 As you can see hear. I tore off the tape after ten minutes, because I don't want to end up like house MD. And here I am stretching it off myself. B/c with thin fabric and heavy paint, it'll seep through and stick to your skin. But it's fine, bc it will wash off bc it's plastic. (ACRYLIC IS VERSATILE GET OVER IT OILS) But still it's plastic so if it doesn't bond and let dry it will stretch and crack. Can't really see here, but let's say this will help with the glitch effect of her character. It's much worse on the second stripe.

So I was impatient and decided to take on the black part as well. I used the smaller fabric paint here bc it was thinner. And I will tell you, getting the first few spritz out of that thing was BAD. It sprayed my like a baby penis, so be careful, always point the tips down to your plate or fabric. IT WILL GET YOU UNLESS YOU TAME IT.

 Here they are all painted up while the last dries. I decided to wait the last guy out bc he wasn't wrapped to tight which was good. I waited a whole Strokes album for him to finish and it wasn't too bad. It had the same crackling but the last stripe is kind of covered by boot so it's fine.
 Here they are all finished. You can't tell the flaws from this resolution but they are there and I accept them way better than half finished sewing. PANTS ON THE GROUND BECAUSE FUCK IT NOBODY'S AWAKE I DO WHAT I WANT
I will update on the taking off process. I'm never going to wash these but I can assure the paint will stay
forever as a stain.

And here we go. Here they are after peeling them off my legs, hanging on the lamp. Before I realized the paints gonna stick to itself. ANd so I have to stretch them....into a really weird shape


Here's what fucking happens when you paint leggings. It's not surprising at all. just if you have sensitive skin. I recommend being over precocious and taping napkins to you skin under the areas you're going to paint. So that way it'll stretch more and just stain the napkin. Not your eczema. Because I had to scrub for a good ten minutes with lotion and water, wasn't too bad for the painting I did. 

Strange shapes indeed bro. I swear it's not a bong. This is the part where I need mannequins. I had to improvise with a whole paper towel roll and a roll of duct tape. The middle is being a bitch and sticking to himself but hopefully it'll get better. These are forever going to be the fragile fankenstein tights


Next on revamping cosplays KugelMugel's hat and possibly Vanellopes twizler!
-RB out

Saturday, July 12, 2014

RB's motivation: Kugelmugel hat FINALLY 'doin shit yourself'

And a little change of pace in the same time frame. I was thinking during the leggings, I might as well kill two birds with one stone and my dad's old shirt popped into my head. This was originally going to become a make it your self duct tape mannequin. Now it's becoming a french beret. It's got towel fabric so it was pretty nice

 Here's the sub hat I used last year and will use for a small pattern now
 Here it is all cut out. I cut two circle just in case and used the hem of the shirt for a sort of casing thing that makes the hat stay on the head.......technicalities and terms I don't know
 So wrapped the hem around my head to find the right size. Pinned one of the circles to the hem and it's really small so far so good thing we have the second circle to add on for later to give it nicer volume and puff.

Hopefully again this all goes well and I'm not wasting more hours of sleep again like I did with making show accurate pony doll hair......
SUNDAY PHOTOSHOOT HERE WE COME -still nervous-
-RB out

Friday, May 30, 2014

Cute Marshmallow Plushies(Cloudy With A Chance Of Meatball's 2 inspired)

Aren't they freaking cute??? This is what happens at far too late oclock.... gonna make more tomorrow! These are kind of a prep for an upcoming cosplay I have planned and I wanted to share these cute little fellows with all of you!

Should I make a diy for these guys? Let me know on here or on Facebook, which is where you can see most stuff before it makes its debut here!


~Lulu

Saturday, January 18, 2014

Geeky Paper Doll Crafting Round up!

Everyone likes a good deal of paper crafting right!?

Well here are some cute paper dolls we found roaming around on Pinterest and Deviantart!


First up is Doctor who inspired paper dolls!
Includes Daleks too!

Next up is the ever popular Breaking bad!
Sorry I couldn't find a website for this....

Tsunyandere's anime character paper dolls are just amazing! Check out her full Deviantart account for more paper dolls. We just picked Panty for the heck of it!


And who could forget Downton Abbey? Gotta love Cousin Violets vast array of facial expressions.


Thats all for this round up! Stay warm out there duckies!

Follow us on Pinterest Deviantart Twitter and Youtube.


Saturday, December 28, 2013

Our top 3 New years Resolutions we need to accomplish.

I think the first and most important goes without saying. Accomplish that Pinterest collection you are hoarding. Trust me, we all are, I mean have you see the Cosplay Confessions Pinterest account? Its a budding monster waiting to eat us. Just sit down and prioritize based on what you need. Some pins are probably just there in case you need them later but trust us, some are there because you need them.

Next is something the messy crafter and cosplayer needs. To get those materials organized!!!!
Our pinterest account has a lovely getting materials organized board. Go check it out for some inspiration.

Lets aim for this!
http://www.mcclurgteam.com/storage-solutions/craft-rooms/

And not the ever popular this.
http://learntosewco.com/?page_id=104


Our last but definitely not the least is getting organized. Throughout this past summer we learned that we need to make to do lists. Trust me they help. We found this on Pinterest and thought that it was lovely. I'm sure you can diy yourself a version from a simple notebook. I know I will be trying.

http://thyme-is-honey.com/2013/12/27/organize-2014/

Also if you have smart(er) phones utilize google calenders. I know its annoying to switch phones and lose appointments that are very far into the future or the next day but if they are saved to google they will be there once you re sync.


Saturday, October 12, 2013

Video tutorials Saturday! Diy halloween costume round up!

This Saturday's Video Tutorials round up is DIY Halloween costumes! Recently I was on Bethany Mota's channel and she has some pretty creative costumes. Sure she did them without sewing but I trust that those of you out there who can sew a straight line will!

Ok here we go!

This one is pretty cute diy shoes and all but I'd make my own petty coat!

I love the goggles she built for this! So gonna use it for other costumes!

<------Really easy cape!

                                                             I really loved how she cut out the hat!!

I really loved all of these costumes and I hope that I get to make one of them if my other halloween costume idea falls through. 
What are your costume plans this year? Leave a comment below!!

Follow us on Pinterest and subscribe to us on Youtube!
~Lulu

Saturday, October 5, 2013

Video Tutorials Saturday- Featuring Love it Yourself!


I have to say, I'm glad I found this channel by chance. It has been pretty under noticed but her tutorials, cosplay tutorials, and her make up tutorials are awesome! I love how well each of her videos are done and they are always great to watch visually and informatively! So lets talk about some of the main type of videos Mizuki does over on LoveItYourself!


As a long time fan of the Nana series along with RB Simms this was great to watch. I might even make one just for the heck of it and not for cosplay!


It doesn't stop at cosplay DIY's she actively adds makeup tutorials about her cosplays! This is one from her collection!


She is also very knowledgeable about other beauty diy's and does reviews and favorites videos! I like favorites just to see if there is any product I should consider maybe trying since they seem to be everyday things. 

She also does an array of nail tutorials and origami if that's more your style.


And of course she has a few really cute DIY's on her channel worth checking out!


Go subscribe to her for more fun and cute videos! Or follow her on Facebook
~Lulu


Want us to feature your video tutorials next time? Email us at cosplayconfessionsblog@gmail.com with a link to your channel or specific videos!

Follow us on PINTEREST for more fun what not!

Friday, August 30, 2013

Diy Vanellope Von Shweetz hair clips using.... beads!!!!


So as some of you may know, RB Simms did a Vanellope cosplay very recently to add to a Disney Princess cosplay group we did. And once we got closer to the date we realized we were missing a very vital part of her cosplay.... Vanellopes candy adorned head! Ya I know... how could we possibly forget. Well running a productions company leaves you with those moments a lot.

So in my moment of craftyness I remembered how she had some stars in her hair and they looked familiar. And after rummaging through our 'going to goodwill' bag I found the old box of beads I'd loved as a kid. And guess what? The beads were perfect for small sprinkles and bits of hard candy!

So you'll need some stuff.


  • A lot of bobby pins(enough for each bead)
  • Lots of beads in bright colors with preferably round or cylindricly shaped. And some yellow star beads(I had these from when I was younger so either a craft store has them  or your young siblings do.
  • A hot glue gun or whatever heavy duty one you want to use.
  • Oh and a peice of card board or thick paper.


Now lets get started! Its so easy its like one or two steps.

1) Take a bead and put a little bit of hot glue on the back
2) make sure the bead is going to be glued to the top of the bobby pin that has the shorter end that curls up slightly.
3) I had a peice of thin card board laying around that I pushed to the end of my table and put the bobby pins with beads still drying on the card board to dry. You could also use a thin magazine or junk mail.
4)though the picture shows wire cuters/wire I did not like it and I went s ddifferent route.
And now you are done! Sorry I didn't get pictures of RB wearing them :< 
But here is the finished product


not the best picture of the hair clips but you can sort of see them :

Tuesday, August 20, 2013

Makeup tips for cosplayers: Taking care of your skin leading up to a convention!

Now during a convention your skin will suffer under the immense amount of makeup you will be needing during the convention. Now not to worry, you just have to make sure your skin is in good shape leading up to the convention! Or at least clean enough. So to make sure you don't upset your skin I recommend you go with mostly natural diy treatments!

But its important to use any prescription creams but if you do use them or any other acne washes make sure you are moisturizing like crazy. Really i'm talking at least twice a day so you don't dry out your skin and create a lot of dead skin. I recommend Neutragena's oil free, fragrance free, spf 15 moisturizer.

Next make sure you are exfoliating  If you have dead skin you really need to be doing this often. I have a lot of dead skin so I do this often. I like to go natural with this step and I love bubz's video on it so here it is! Not to mention this is very lovely on your skin and it is cheap. I also recommend the neutragena wave cleaner thing with exfoliating scrub pads if you need that extra help like me. If you really need extra help with exfoliating i recommend you use heavy duty ones like from neutragena and clean and clear and moisturize right after. But always rinse with cold water to reduce pore sizes!


I also recommend you save the rest of the green tea and cool it in the fridge to put on your skin later. This will help shrink pores since its cold and it will reduce redness.

Also make sure you use some diy pore strips since again they are cheap and easy to make and not to mention kind on your skin.


Now my last tip is to use a china clay mask. These are miracle workers in my opinion. I really love the one from proactive and if you ever invest in their products this is the one i recommend since despite its size it is worth the $20. But in the span of 2 years I used it all up I now use one from Jafra that came with a kit but it still works very well. Do some research on them on youtube to see if you'd like to try one or which ones you can buy in store since so far I've seen they are really worth it. 

Also some parting wisdom about the actual weekend of the convention. Make sure you are removing the makeup with either actual wipes or makeup removers or my personal cheap favorite(any type of hand lotion or facial moisturizer, yes it works). 

Have fun with your makeup that weekend know that your skin will be up to the challenge.!

~Lulu

Thursday, August 15, 2013

Diy a messy dirty look for post apocalyptic cosplays

So today we had an awesomely fun time doing construction for the Left For Dead 2 cmv we are doing at the end of this month(aka next week).

We Quickly ran into the need to dirty up all of the costumes since, lets face it, a survivor will not be beautiful. I had once seen the suggestion of rubbing coffee grinds on people to achieve the look. 


Now confession time, it works but not very well by itself. You get very light dirt marks using the cheap coffee grinds. 


With a little problem solving RB and i came up with a way around that. Solution???? Just add water, well get your fingers wet for sure and then smear away. This is sticky and it is messy so fair warning, do not do this on your friends carpet. Take this process outside. RB also mixed gatorade in at some point because we needed to finish like 2 full bottles of it.


Now this isn't even the dirtiest we were able to get her shirt. We added a lot more and then blood so you just have to keep adding!


BTW made the shirt design myself (RB in about a 5 minutes from the good ref)

Now don't forget to do the back and the bottom of the jeans as well as any visible skin like the neck and what not. 

(Edit by RB) No pics of the finished results but they basically lookd like this. On clothes.

Gatorade is good for really sticky dirt because of the sugar content but water and this work pretty much the same. WHy Coffee though? Well you might not have some fresh dirt around say in the drier parts of the earth. And it smells much better

~ Lulu/RB

Monday, August 12, 2013

DIY fake cigarettes using......STRAWS

This is R.B. again. Today we will be discussing those tiny details that can sometimes pull a concept together nicely, or atleast cut off the dead ends of music video prop making

Now that sounds pretentious BUT I do take pride in this one creation.

FAKE CIGARETTES. -sorry no pictures of the final product as that was two months ago-
(I lulu kept one) 


BUT I have no common sense and I consider this idiot proof.

Materials:
-plastic straws, opaque white ones w/ or w/o fun stripes but mainly opaque white is recommended
-white acrylic paint, rec craft as it is very opaque
-goldish orange paint ^ same brand^
-toilet paper
-pencil
-scissors
-water
-dark brown paint, any kind will actually but for quick dry time do acrylic
-small paint brush I prefer flat brushes close to a perfect square

Step one.

Cut your straws into smaller pieces. I chose straws because they're easy to get and are very close in diameter to a real cigarette. If you're making many and used ones get a variety of sizes. For used ones try and cut at an angle to get those burned edges. You can gestimate on sizes really because some brands can be very long while others are much shorter.

Step two.

Get your plastic straws and paint them white. You might have to layer the paint to get the most opaque solid color but be patient. It shouldn't take more than 10-15 mins really unless that's a life time for you. Do at least two layers for each cigarette

Step three. (If you are going filterless skip this step)

Once they are completely dry paint one end of each with your goldish orange paint. Try to make it opaque again by layering it twice. Get the lines straight showing where the filter ends and the actual paper starts. But still don't get anal if you want to get a variety of sizes. For the butts you still have to show a filter because, for all the non smokers confused, you put your mouth on the filter and it doesn't get burned off when left behind. If you're trying to make a new pack it's time to develop OCD. Let the paint dry and move on

Step four.

This I think is the fun part, filling them up so no light can show through. because face it if you are making lots you are probably not going to get super solid painting. It also gives them some weight to get a better feel for your nicotine addicted character. AND when you turn it the camera won't see a gaping hole through it showing it's a painted straw. And you won't be called a poser smoker.

So get your pencil and a toilet paper. Take off some SMALL strands of teepee AT A TIME. Roll them up pretty small and just stuff them through the straws entirely. Don't get super tight in them, it's better to actually spread the tp out thinly through out the tube so you can spare using an entire roll of angel soft charmin. Because that will not be fun when you get yelled at about it by room mates on wasting tp.

It is important to fill the whole tube though as a cigarette is filled all the way for extra lung cancer. You'll want a bit of tuff filling out of the non filtered end to look like the rolled tobacco.


Step five.

Last step is to get your brown paint and water it down slightly. Just dab both ends till no white of the tp is visible. You'll want the paint to be kind of thick so it will clump the tp into a rough bump texture. Don't be afraid to get some of the ends a bit splattered. As we should all know cigarettes are filthy.

And there you have it. This is not a strict tutorial, just my own method made at 1 am. Be prepared to experiment for your own desired result. And if you want to reject this reality please substitute it for your own!

-I will update with pictures when we make some more- 
I got ya covered RB! ~ Lulu


GOOD LUCK CANCER MEN WOMEN AND CHILDREN

~ RB Simms

Thursday, August 8, 2013

Fitted bodice without a pattern prelude.

So in my attempts to do diy's a year ago I found a good video on how to redo a shirt. And in my attempt to make my Hungary dress I revisited this video. I will be making my own series of videos called Lulu vs. Patterns because trust me Patterns and I have a lot of animosity between us.  But this video is a good sort of reference. It is also a fun diy for shirts btw!


~Lulu

Wednesday, June 12, 2013

Useful tutorials for cosplayers of the week!

Hello duckies! So this a new sort resource type of blog post I want to have done at least every other week. These will be useful tutorials to have as references when doing cosplays and or making props. So lets get going.
p.s. I found all of these on pinterest. Follow us on pinterest at Cosplay Confessions or follow Stupidity Reigns Pro.  or follow Lulu's. Sorry the actual cosplay confessions account is looking kind of sad, I(lulu) had some problems managing accounts and created two in the process on account of not being able to access one ^^

1) Knowing what type of glue to use for a cosplay is very important! Know your glues! This could cut your prop making process down by a ton! Read the full article on Designsponge. But either way keep their handy picture on file.

2) Modge podge is a timelessly trusted crafting and prop making tool. And those wonderful people who make modge podge thought it would be just awesome to add different finishes. Though the blog post we are taking them from is about a cute diy book its still worth checking out Cute spell book diy and original picture.

And last but not least we continue with our theme of useful crafting material tutorials. 
Now this one is less of a tutorial but really a mention of a fan favorite, Chalk. Now recently I learned that chalk can remove grease stains, who knew? Well they obviously knew over at the Life hacker. blog. But cosplayers also have another very useful purpose for chalk. It is amazing for drawing out patterns and marking stuff on fabrics. Now this doesn't mean go out and steal your little siblings sidewalk chalk, or dig yours out of the garage. I suggest the type of chalk teachers used to use on chalk boards which can also be found in different colors since white will not always show up on white. Look for it next time you are in a store that might sell chalk. 

This is the type of chalk that I find most useful without it being specifically for sewing(because that is out there too).
~ Love Lulu!


Pageviews